Google Maps – Travel Mobility Tips and Tricks
The capabilities of Google Maps have increased steadily since it launched in 2005. Google Maps has numerous features that help travelers get around new places quicker and more efficiently. Some of you may still be traveling around with your paper maps. but Google Maps really has everything you need to improve your travel experience and leave your paper map behind. In this post, we cover travel mobility trips and tricks for Google Maps, including the Street View feature, the relatively new Wheelchair icon, specific features for directions/navigation, and Offline Maps.
Is Google Maps new to you or are you unsure how to use it for navigation and to search sights or businesses? If so, here is a great 8 minute YouTube video to learn the basics. It is several years old so some of the Google Maps graphics look slightly different but all the steps/how-tos are current. Once you have learned the basics, come back to this post to learn some extras to make it easier for you to get around on your travels!
Note: This post uses screenshots from an iOS (iPhone) using the Google Maps app. There will be some visual differences if you use an Android or use Google Maps on your desktop but the features are the same.
Street View
The first of the travel mobility tips and trips is to utilize Google Maps’ Street View. Street View has numerous benefits to you as a traveler. First off, it lets you see what the front of a hotel, restaurant, etc, looks like. This helps prevent walking up and down the same block multiple times until you find the door you’re looking for. Secondly, it allows you see the condition of a street. Is there a sidewalk or cobblestones or is it on a steel hill? Thirdly, you can see if there are any steps/stairs to get inside your destination.
There is also a “Live View” you can use to see what street you’re on. This requires use of internet and can drain your battery quickly. I prefer the using the blue dot and offline maps which do not require use of internet. Keep reading to learn how to utilize these.
Example of Street View


As you see above, I searched for Hotel Albergo del Senato next to the Pantheon in Rome. From the view in the picture, it gives you a general idea of the open space in front of the hotel. If you click on the square picture on the bottom left, that will open up the street view. This allows you 360 degree view of the area right outside the hotel. Looking at the street view, you will see there are two steps to enter into the lobby of that hotel with no railing. The street appears level and is composed of mostly smooth, flat cobbles. To exit out of Street View, simply push the back arrow in to top left corner. You will then be back to the screen above on the left. Do you want to learn more specifically about Rome’s streets and hills? Check out our post about Rome’s Terrain.
Accessibility Icon
A newer feature of Google Maps is the blue wheelchair icon, similar to the image above. When you look up a restaurant, hotel, tourist sight, etc, you should now see a blue wheelchair when you click on that business. This icon indicates the location is partially or fully accessible. If there is a strike through the wheelchair, it means it is not a barrier free or accessible location.
When you are viewing a business/location on Google Maps, continue to scroll down until you see the wheelchair icon again. This section that tells you more about the accessibility. It will show a checkmark or an “X” next to four items if applicable: Entrance, Seating, Parking and Restrooms. Per this page from Google Maps, here are the requirements to be met for each:
Example of Accessibility Icon
As you may have noticed with the hotel above, there was not an accessibility icon for the listing. These are not yet available with all businesses listed on Google Maps around the world but you will more often than not see the icon in well populated or visited locations. Let’s look at this next example:
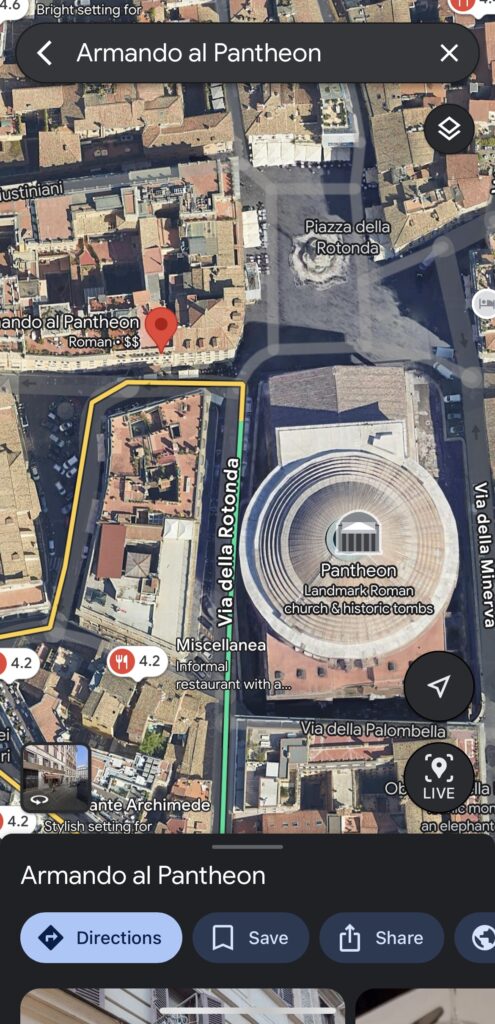

When we pull up the information about the restaurant Armando al Pantheon, we see the wheelchair icon in screenshot on the right, next to “Roman restaurant” and the two dollar signs. This indicates that Google Maps has identified it as an accessible restaurant. Below the restaurant’s address, we see the wheelchair icon with some additional information. The entrance and seating are marked as accessible but not parking or restroom. The other feature is at the very bottom of this screenshot: “See wheelchair accessibility reviews”. When you tap anywhere in that box, it takes you to user reviews about wheelchair accessibility as seen below.

Again, the accessibility information is a fairly new feature. As more Google Maps users leave reviews and add information in about entrances, seating, etc, it will improve. Emailing or calling a hotel or restaurant to ask questions specific to your mobility needs will always yield the best results for you.
Directions through Google Maps
Even though you already know how to search for directions on Google Maps, there are some extra features the directions can tell you. These extras will help you decide what places you want to walk to, take public transportation or a taxi to. It will also give you an overall idea of mobility demands as you put your itinerary together, allowing you to spread out physically demanding activities vs. having them clumped together.
Elevation Gain/Loss
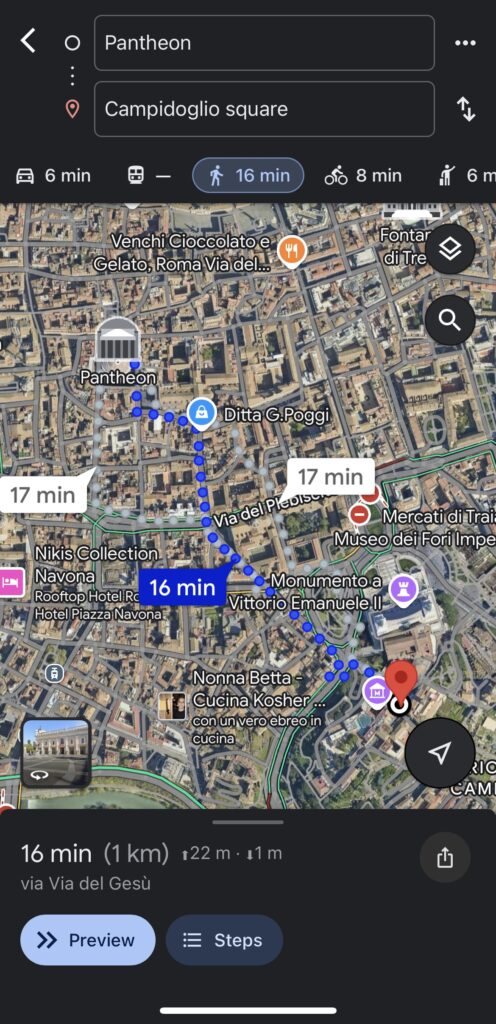
When searching directions between 2+ locations, Google Maps shows you how much elevation gain/loss you will cover. You see this below in the bottom of the left screenshot . When you tap on “Steps”, you’re taken to the screenshot on the right. The graph shows you where and how steep your elevation gain/loss will be. “Steps” will also often show you if the altitude change involves stairs or a hill. Selecting the street view on the steep parts may give you a better idea if you want to do it or not. In this example below, you can see it is mostly flat with most of the elevation gain at the end. If you were to look at the street view at the end of the directions, you’ll see a very long flight of stairs you would need to climb to reach Campidoglio square.

Mode of Transportation Options
As you also see from the screenshots above, you have the options of driving, walking, public transportation (not available for this route as indicated by the dash), bicycling or taxi/rideshare. Selecting each of these options will show you step-by-step instructions. This will allow you to decide what the best option is for you factoring in time, distance, mobility, etc.
Offline Maps
Last but not least of the travel mobility tips and tricks is perhaps my favorite feature of Google Maps. Utilizing Offline Maps saves your phone battery and does not require WiFi or use of cellular data. You download a map of the area you will be in ahead of time and then can use the map on airplane mode (without data or WiFi). The best part is that you’ll also have the blue dot (your GPS tracker) showing you where you are all all times! As long as you are signed in to your Google account, you can download offline maps from the Google Maps app or google.com/maps and they will be stored in your account on either device. Below is a step-by-step guide of how to download an offline map from the Google Maps app:
How To:

First, have your map focused on the area you want to download. If you’re currently in the USA and want to download a map of Rome, have Rome showing on your map.
Next, go to your account settings in the app by tapping on your initial (or picture) in the top right corner. You will then see this menu appear. Select “Offline maps” from this list.
Next, you will tap “SELECT YOUR OWN MAP”


Next, you are taken to this map screen showing you what will be downloaded. You can zoom out to cover more of the region but remember this will take up more storage space on your phone. As shown in this example, it downloads quite a large area so you will likely only need to download one map per city/town you visit.
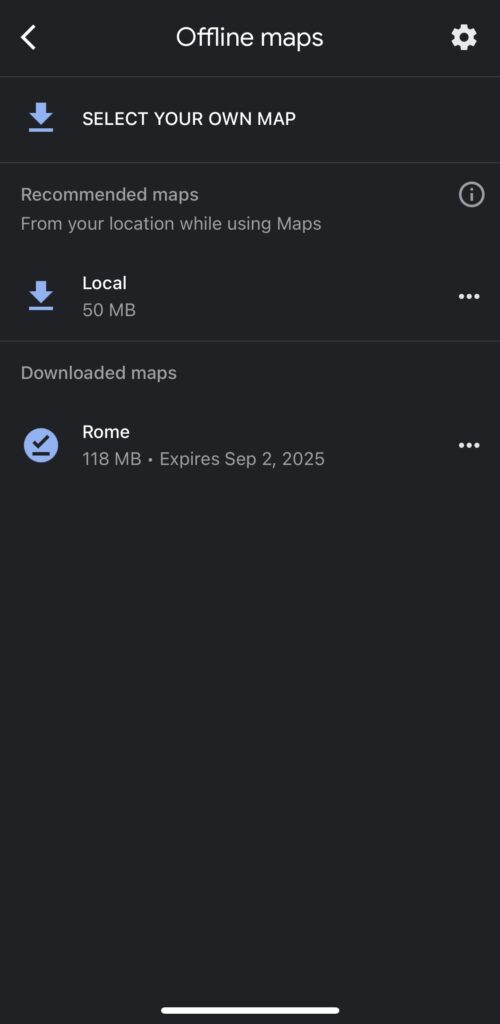
Once the map has downloaded, it will show up under “Downloaded maps”. The map will likely download as “Map 1”. You can rename it as I did (Rome) by tapping on the three dots on the right of the downloaded map and select “Rename”.
As you can see, the map expires on the pictured date. You can delete them at any time by tapping the three dots and selecting “Remove”.
Make sure it Works:
Voila! You have your offline map! To ensure you have done it correctly, close out of your Google Maps app and put your phone on airplane mode. Then, open up Google Maps again. If you are in the location you have downloaded the map for, it will take you immediately there with your blue dot. If not, go back to your initial in the upper right corner and click on “Offline maps” just as we did to start. There, you will see your offline map. Click on it and it will take you to the location. You will be able to zoom in for specific sights, streets. Offline Maps also downloads opening hours and basic information of many hotels/restaurants/sights. It will not let you search for directions from an offline map so research that in advance or practice using the blue dot to navigate your way around!
I hope this post on Travel Mobility Tips and Tricks with Google Maps will be helpful to you as you plan your trips and also while you are on them!
Read Related Posts from Have Age Will Travel
Mobility Guide for European Train Travel
Mobility Considerations to Discuss when Traveling with Friends and Family
Travel Mobility Tests: How is my Mobility for Travel?
All About Robotic (Autonomous) Airport Wheelchairs
Pin this Post for later or to Share with your Friends!